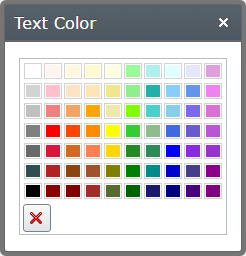
Have you ever used the Dijit ColorPalette to create a color picker property? You probably have.
It’s pretty simple as you can read here.
However, this ColorPalette has some disadvantages.
You can’t change the colors, only switch between 2 predefined palettes.
You can’t clear your selection. Once you have chosen a color you can never unselect it, only select another one.
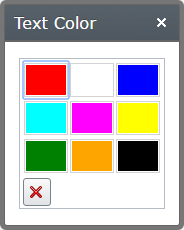
So let’s extend the ColorPalette. We want to chose the colors ourself and also the number of colors. We also want a reset button to clear the selection.
Let’s start with the reset button. Make a copy of the original ColorPalette.html file and add the button. (Copy it for example to \ClientResources\Scripts\Editors\Templates)
<div class="dijitInline dijitColorPalette" role="grid">
    <table dojoAttachPoint="paletteTableNode" class="dijitPaletteTable" cellSpacing="0" cellPadding="0" role="presentation">
        <tbody data-dojo-attach-point="gridNode"></tbody>
    </table>
    <button data-dojo-props="iconClass:'dijitEditorIcon dijitEditorIconDelete', showLabel: false"
            data-dojo-type="dijit/form/Button"
            data-dojo-attach-event="onClick: clearSelection">Clear</button>
</div>
The data-dojo-props attribute sets some properties for the button: display an icon on the button and hide the label.
The data-dojo-type attribute tells Dojo this is a Button widget.
The data-dojo-attach-event will attach the function clearSelection to the onClick event.
Next we will extend the ColorPalette to use this button. (Put it for example in \ClientResources\Scripts\Editors)
define([
    "dojo/text!./templates/ColorPalette.html",
    "dijit/ColorPalette",
    "dijit/_WidgetsInTemplateMixin",
    "dojo/_base/declare"
],
    function (template, ColorPalette, _WidgetsInTemplateMixin, declare) {
        return declare("alloy.editors.ColorPalette", [ColorPalette, _WidgetsInTemplateMixin], {

            templateString: template,

            widgetsInTemplate: true,

            clearSelection: function (evt) {
                this.set("value", null);
            }
        });
    }
);
As you can see this is pretty simple. We override the templateString for the ColorPalette. Since our template contains a button widget we have to use the _WidgetsInTemplateMixin and set the widgetsInTemplate property to true. The function clearSection simply sets the value to null.
To use our new ColorPalette we need an editor descriptor
[EditorDescriptorRegistration(TargetType = typeof(string), UIHint = "ColorPicker")]
public class ColorPickerEditorDescriptor : EditorDescriptor
{
    public override void ModifyMetadata(ExtendedMetadata metadata, IEnumerable<Attribute> attributes)
    {
        ClientEditingClass = "alloy/editors/ColorPalette";
        base.ModifyMetadata(metadata, attributes);
    }
}
You can now decorate you properties with a [UIHint(“ColorPicker”)]
[UIHint("ColorPicker")]
public virtual string TextColor { get; set; }
If you only wanted a reset button on the ColorPalette, you’re done. If you want to configure your own colors, keep on reading.
We can pass values to our ColorPalette by using the EditorConfiguration dictionary. We will set a value for the property ‘colors’ with a 2 dimensional array of colors.
[EditorDescriptorRegistration(TargetType = typeof(string), UIHint = "ColorPicker")]
public class ColorPickerEditorDescriptor : EditorDescriptor
{
    public override void ModifyMetadata(ExtendedMetadata metadata, IEnumerable<Attribute> attributes)
    {
        ClientEditingClass = "alloy/editors/ColorPalette";
        EditorConfiguration["colors"] = new [,]
        {
            {"red", "white", "blue"},
            {"#00ffff", "#ff00ff", "#ffff00"},
            {Color.Green.Name, Color.Orange.Name, Color.Black.Name}
        };
        base.ModifyMetadata(metadata, attributes);
    }
}
As you can see we can use named string, hex strings of the build in Color objects.
Normally you would not hard code this array in your editor descriptor, but for the simplicity of the example I did.
Now we have to modify the ColorPalette to use our custom colors.
define([
    "dojo/text!./templates/ColorPalette.html",
    "dijit/_Widget",
    "dijit/_TemplatedMixin",
    "dijit/_WidgetsInTemplateMixin",
    "dijit/_PaletteMixin",
    "dojo/i18n",
    "dojo/_base/Color",
    "dojo/_base/declare",
    "dojo/dom-construct",
    "dojo/string",
    "dojo/colors",
    "dojo/i18n!dojo/nls/colors",
    "dojo/colors"
], function (template, _Widget, _TemplatedMixin, _WidgetsInTemplateMixin, _PaletteMixin,  i18n, Color, declare, domConstruct, string) {

    var ColorPalette = declare("alloy.editors.ColorPalette", [_Widget, _TemplatedMixin, _WidgetsInTemplateMixin, _PaletteMixin], {

        templateString: template,

        widgetsInTemplate: true,

        clearSelection: function(evt) {
            this.set("value", null);
        },

        _dyeFactory: function (value, row, col, title) {
            return new this._dyeClass(value, row, col, title);
        },

        buildRendering: function() {
            this.inherited(arguments);

            this._dyeClass = declare(ColorPalette._Color, {
                colors: this.colors
            });

            this._preparePalette(
                this.colors,
                i18n.getLocalization("dojo", "colors", this.lang)
            );
        }
    });

    ColorPalette._Color = declare("dijit._Color", Color, {
        template:
            "<span class='dijitInline dijitPaletteImg'>" +
                "<img src='${blankGif}' alt='${alt}' title='${title}' style='width:40px;height:30px;background-color: ${color}'/>" +
            "</span>",

        constructor: function (alias, row, col, title) {
            var color = alias.lastIndexOf("#") === 0 ? alias : Color.named[alias.toLowerCase()];

            this._title = title ? title : alias;
            this._row = row;
            this._col = col;
            this.setColor(color);
        },

        getValue: function () {
            return this.toHex();
        },

        fillCell: function (cell, blankGif) {
            var html = string.substitute(this.template, {
                color: this.toHex(),
                blankGif: blankGif,
                alt: this._title,
                title: this._title
            });

            domConstruct.place(html, cell);
        }
    });

    return ColorPalette;
})
For this code I made a copy of the original ColorPalette.js and stripped out all the hard coded palette info. Then I replaced the palette properties in the function buildRendering with the colors property we created in the editor descriptor. (this.colors)
I’ve also added some inline styling to make the color areas a little larger.
By copying and modifying the original ColorPalette we do have some duplicate code. I tried inheriting from the ColorPalette and override some functions, but couldn’t get it to work. If you know a better solution, leave a comment.